Build (and Run!) Your Own Image Classifier using Colab, Binder, Github, and Google Drive (Part 2)
A beginning beginner's step by step guide to creating cool image classifiers for deep learning newbies (like you, me, and the rest of us)
Building your own image classifier is fun!
This is Part 2 of a two-part article on building your own image classifier.
If you haven’t read the Part 1 yet, please read it first as this second part continues where the Part 1 left off.
Here’s the link to Part 1.
Sharing your app to the world
In order to share it to the world, we will be using Binder , another cloud based service that can run Jupyter notebooks as applications (much like Colab can also run Jupyter notebooks).
The difference is that Colab is an interactive editor environment (allowing you to edit and run your Jupyter notebooks) while Binder is just for running your Jupyter notebooks as applications.
Create a Github Repo
In order to run your Jupyter notebook on Binder, we will need to create a Github repository (also known as a repo), which is a place to store the associated files necessary to run your app.
This includes the exported image classifier named export.pkl file which we built earlier.
If you haven’t done so earlier, you’ll need to create a Github ID, which grants you access to the Github site and allows you to create your own repos.
Click on the link here to create a Github ID.
Once you’ve created a Github ID, you can now create repos on Github.
Click on this link here to generate your repo.
(Make sure to change the name of project to something that is NOT the same name as original name build-your-own-image-classifier-template).
This is to work around a limitation of Github regarding public forks. Naming your project build-your-own-image-classifier (without the -template) is fine, but naming your project to something unique for yourself would be better.
Please note down the name of your Github ID, your Github password as well as the name of your repository (or repo for short) as you will use them in the next steps below.
Upload your exported image classifier file to Github
Once you’ve created your Github repo, you are now ready to “push” or copy the exported image classifier from your Google Drive to your Github repo.
(If you’re wondering why can’t we just download the exported image classifier from Colab and upload it to your Github repo – it’s because of a limitation of Github which restricts uploads of files bigger than 25MB. Unfortunately, your exported image classifier file (export.pkl) is usually bigger than this so we have to use git - a version control system used by Github, to move the exported image classifier from Colab to our Github repo)
Click on the button below to run another notebook on Colab which will do this.
Fill out your github repo, github id and password as explained in the notebook.
![]()
Once you have done this, your exported image classifier should now be visible in the list of files of your Github repo.
Your Github repo URL should have the format https://github.com/<your-github-id>/<your-github-repo-name>.
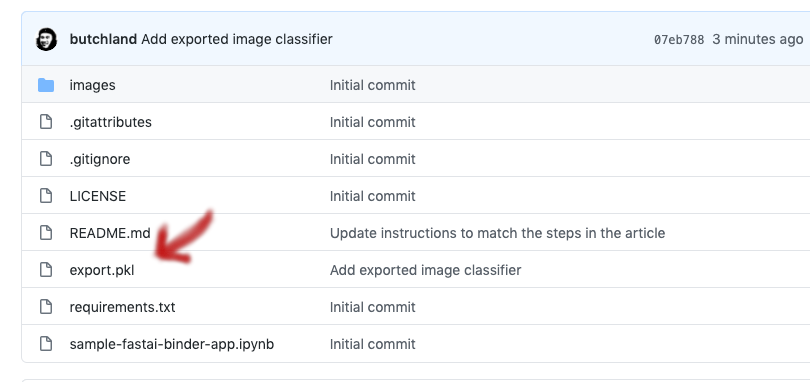
Please check that the export.pkl file is in the list of files of your repo.
(If it’s not there, then something went awry with the previous step – maybe your github id, github repo or password were entered incorrectly. You might need to rerun the previous step above.)
Run your app on Binder
In order to run Binder, please take note of url of the Github repo you created in the previous step.
Next, head over to Binder by clicking here.
Configure Binder as shown below.
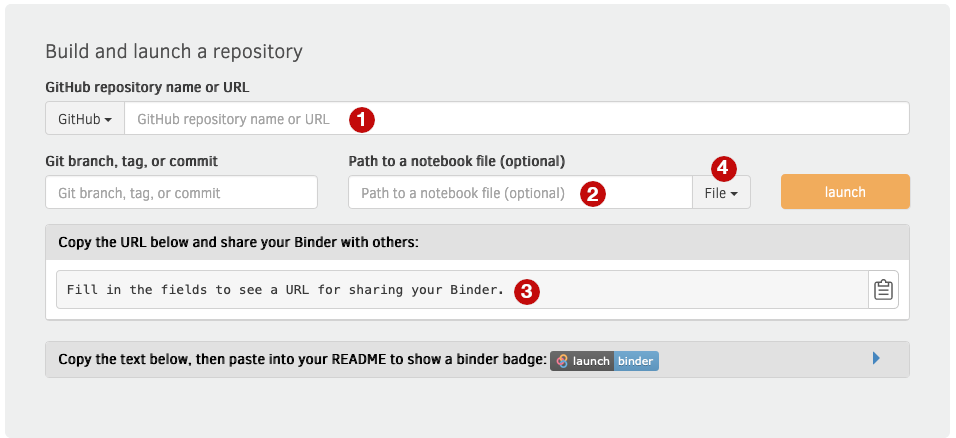
In the GitHub repository name or URL field (marked with the text 1), paste the url of your Github repo.
In the Path to a notebook file (optional) field (marked with the text 2), enter /voila/render/build-your-own-image-classifier.ipynb.
Change the path type (marked with the text 4 right next to the Path to a notebook file (optional) field) from File to URL.(This will change the label of the previous field to URL to open (optional))
Make sure to fill out the three fields correctly.
Once done, click on Orange-Yellow “Launch” button (located right next to the URL to open (optional) field) and you are all set.
(Note that starting your application the first time will be slow, as Binder must first assemble your application into a ready-to-run format. The next time your application starts, it will start up a little bit quicker.)
Note down the Share URL to your app (marked with text 3 in the above image) so you can share it with your friends and family to explore.
Copy and Share your Binder App Link
When you run your app on binder, Binder provides a link to rerun your app. Save the link and share that link to your friends and family so they can run your application.
Profit!!
If you followed the steps above, you now should have image classifier running on Binder so its time for Profit!!
What we learned
-
Learning to do Deep Learning (of which building Image Classifiers is part of) is definitely within the reach of ordinary folks like us.
-
You don’t need to have deep pockets to do Deep Learning.
-
You don’t always need to have lots of data to do Deep Learning.
Want to learn more?
If you want to learn more (we’ve just scratched the surface), take this totally free course (no Ads!) called Practical Deep Learning for Coders – it will teach you Deep Learning from top to bottom, using running code, on Jupyter notebooks like the ones we used on Colab, and build useful applications beyond the simple image classifier we built here.
You can also join an inclusive global learning community that welcomes beginners and experts alike and ready to help you start your deep learning journey.
Hope to see you there!
Final Note and Acknowledgements
The software used to clean your data, build your classifier and run your application is largely based on the fastai python package, written by Jeremy Howard and Sylvain Gugger.
The Jupyter Notebook environment that enables us to run interactive documents to build our image classifier won the 2017 ACM Software System Award and is widely used by scientists, researchers and students around the world.
The software package used to collect the images (jmd_imagescraper) was built by Joe Dockrill (@joedockrill), one of the students of the fast.ai course.
The fast.ai course Practical Deep Learning for Coders is considered one of the best introductory courses on Deep Learning, which is taught by Jeremy Howard and Rachel Thomas, who are also the founders of fast.ai, a non-profit organization working towards democratizing the use of AI in the world.
There’s also a book “Deep Learning for Coders with fastai and PyTorch: AI Applications Without a PhD” available on Amazon, but the authors (Sylvain and Jeremy) have made the whole book available as Jupyter notebooks for free as well.
The steps to run on Binder were based on a forum post created by Vikrant Behal (@vikbehal), another student of the fast.ai course.
If you liked this article, and most specially if you were able to build your own classifier based on this article, give me a shoutout on my twitter account @butchland or message me on the fastai forums: @butchland, I’d really appreciate it!